
Reading the Drop Cut
Just like an archeologist can read the history of a canyon wall, an experienced plasma cutting operator can take one look at the cut surface and tell you what went right, what went wrong and how to correct your mistakes. This is called “reading the drop cut.”
A good drop cut has:
Fine, consistent and parallel drag lines from top to bottom.
Lines that are perpendicular or angled by up to about 15 degrees, with the variability caused by a combination of travel speed and torch angle.
A square top edge, no top splatter, and very little dross on the bottom of the cut.
Dross results from metal that melted and re-solidified instead of being ejected by the force of the plasma jet. A small amount is acceptable.

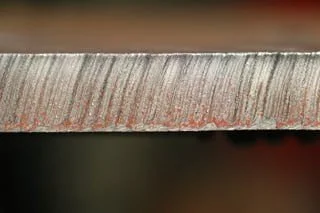

Three examples of a good cut. Cut A shows the maximum capacity on 1-in. steel. Cut B (on ½-in. steel) shows steady travel but room to move faster as indicated by perpendicular lines. Cut C, with its 15-degree drag lines and smooth surface, demonstrates the maximum travel speed and perfect torch mechanics.
How to Get a Good Drop Cut
Now that you know what a good drop cut looks like, how can you achieve all it requires?
Use the Proper Travel Speed
Excessive travel speed creates sparks flying in all directions. Because the arc hasn’t fully penetrated the plate, the molten metal has no place to go. Moving too slowly, on the other hand, causes the arc to “over-burn” the kerf with dross building up on the cut bottom.
Position the Torch Correctly
Too much of a tilt extends the arc more than necessary. J-shaped drag lines and excess dross can also indicate too much of a tilt. Straightening the torch and holding it at a perpendicular angle will create a cleaner cut, as well as increase travel speed by as much as 20%.
Pause & Roll
Move the torch like pendulum on a grandfather clock. Assuming a left-to-right travel direction, use this to make a drop cut. Position the top of the torch over the edge of the plate, point the torch at the 7 o’clock position, trigger the arc and roll the torch to the 6 o’clock position.
Pause for a second on the edge of the plate, allow the arc to penetrate through to the bottom of the material, and then move forward. Exiting the cut requires a reverse of the pendulum technique. When the top of the torch has reached the end the plate, remember that the plasma jet is lagging by 5 to 15 degrees.
If you’ve been using a slight drag angle to the torch, roll the torch to a perpendicular position and pause for a moment to allow the plasma jet to catch up. Finish the cut by rolling the torch toward the 3 o’clock position to sever the top corner to get a clean drop cut.